1. Introduction
I have received yesterday my Raspberry Pi (http://www.raspberrypi.org/) unit.
After complete successfully the basic setup (http://www.raspberrypi.org/quick-start-guide) and after installing the Debian Squeeze distribution provided by the community (http://www.raspberrypi.org/downloads) I want to collaborate with this interesting project by writing a step by step tutorial that will show how to create a program on C++, and how to run it and debug it on our Raspberry.
2. Pre-Requirements
2.1 Eclipse
As usual Eclipse is not completely mandatory (You can directly write C++ files with almost any text editor), but It is a great help.
If you do not have JAVA yet, you have to install it. You can do it from the package manager.
Download Eclipse IDE for C/C++ Developers from the official download page (http://www.eclipse.org/downloads/)
Unzip it and execute the 'Eclipse' file inside the 'Eclipse' folder
2.2 Arm Toolchain Cross Compilation
In order to generate programs that can run and be debugged on our RaspBerry, we need to install an appropriated compiler and an appropriated debugger.
2.2.1. Add the native compiler, make and ncurses library if they are not already in your development system.
2.2.2. Add the following line to /etc/apt/sources.list
3. Our first Raspberry project
3.1 Open Eclipse and click on File --> C++ Project
3.2 Select Cross-Compile Project and give it a name and click on finish.
3.3 Create a "src" folder inside the just created project and include a source file called "main.cpp" inside it. Fill the main.cpp with the following content:
4. Cross Compiling and executing the 'Hello World' project
4.1 Now that we have our project written, we need to compile it. In order to do that, open the project properties select settings and on the 'Cross G++ Compiler' change the command 'g++' by arm-linux-gnueabi-g++:
4.1 Do the same on the Cross G++ Linker:
4.2 Build the project, (Ctrl+b) you should get a message on the console like the following one:
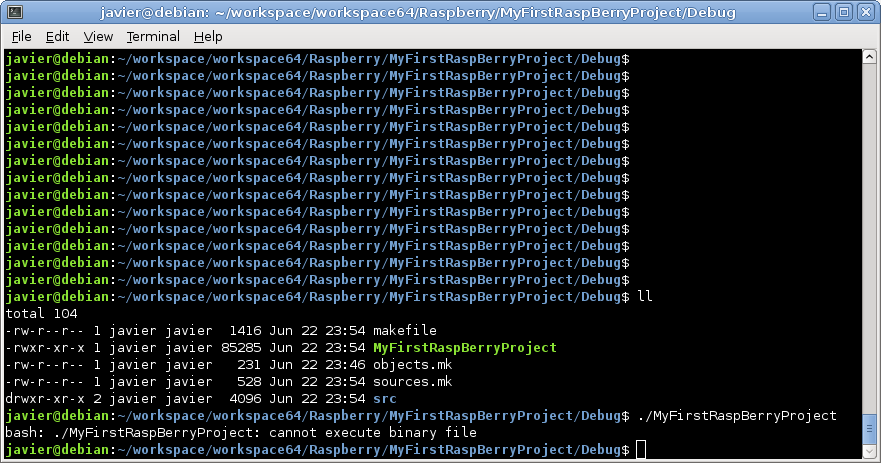
As you can see, the project has been compiled and linked by using arm-linux-gnueabi-g++, that was the whole point. If you try to run the compiled from eclipse you wont see nothing happening. If you try to run it from the command line, it wont be recognize as an executable:
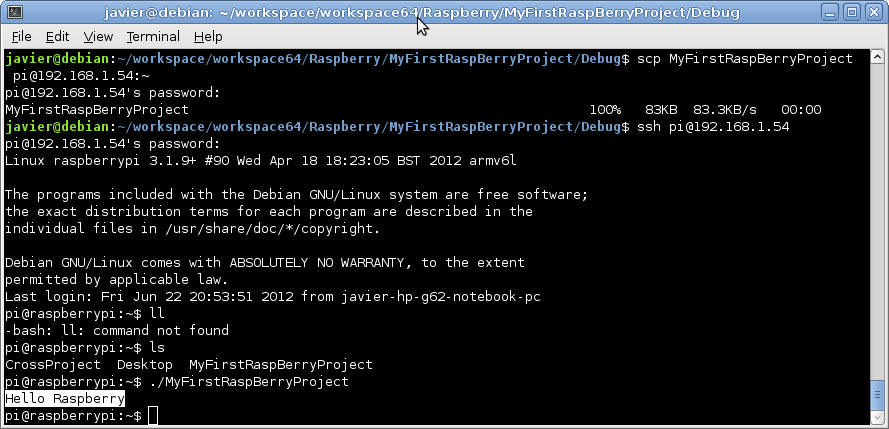
But if you copy it and execute it from the Raspberry:
Voila!! Our first C++ Cross-project running on Raspberry :D
4. Cross Debugging the 'Hello World' project
Now that we have run successfully our project, let's see how we can debug it.
4.1 Install on your Raspberry gdbserver
I have received yesterday my Raspberry Pi (http://www.raspberrypi.org/) unit.
Fig 1. Raspberry Pi connected
After complete successfully the basic setup (http://www.raspberrypi.org/quick-start-guide) and after installing the Debian Squeeze distribution provided by the community (http://www.raspberrypi.org/downloads) I want to collaborate with this interesting project by writing a step by step tutorial that will show how to create a program on C++, and how to run it and debug it on our Raspberry.
2. Pre-Requirements
2.1 Eclipse
As usual Eclipse is not completely mandatory (You can directly write C++ files with almost any text editor), but It is a great help.
If you do not have JAVA yet, you have to install it. You can do it from the package manager.
Download Eclipse IDE for C/C++ Developers from the official download page (http://www.eclipse.org/downloads/)
Unzip it and execute the 'Eclipse' file inside the 'Eclipse' folder
2.2 Arm Toolchain Cross Compilation
In order to generate programs that can run and be debugged on our RaspBerry, we need to install an appropriated compiler and an appropriated debugger.
2.2.1. Add the native compiler, make and ncurses library if they are not already in your development system.
sudo apt-get install gcc g++ make libncurses5-dev
2.2.2. Add the following line to /etc/apt/sources.list
deb http://www.emdebian.org/debian/ squeeze main
2.2.3. Install the following packages:
sudo apt-get install linux-libc-dev-armel-cross
sudo apt-get install libc6-armel-cross
sudo apt-get install libc6-dev-armel-cross
sudo apt-get install binutils-arm-linux-gnueabi
sudo apt-get install gcc-4.4-arm-linux-gnueabi
sudo apt-get install g++-4.4-arm-linux-gnueabi
sudo apt-get install uboot-mkimage
2.2.4. Install the remote gdb:
sudo apt-get install gdb-arm-linux-gnueabi
warning: At this point you can find conflicts with the already installed gdb (http://bugs.debian.org/cgi-bin/bugreport.cgi?bug=603347). If it is the case you will need to upgrade from gdb 7.0.1 (the currently installed) to gdb 7.4.1 (You can find it on http://ftp.gnu.org/gnu/gdb/). You will need to download it, configure it and install it, but do not worry too much, there are just 3 steps that can be found on the README file inside the downloaded file.
3.1 Open Eclipse and click on File --> C++ Project
3.2 Select Cross-Compile Project and give it a name and click on finish.
Fig 2. Our first Raspberry project on C++
3.3 Create a "src" folder inside the just created project and include a source file called "main.cpp" inside it. Fill the main.cpp with the following content:
Fig 3. Content and structure of our first Raspberry project on C++
4. Cross Compiling and executing the 'Hello World' project
4.1 Now that we have our project written, we need to compile it. In order to do that, open the project properties select settings and on the 'Cross G++ Compiler' change the command 'g++' by arm-linux-gnueabi-g++:
Fig 4. Cross project compiler
4.1 Do the same on the Cross G++ Linker:
Fig 5. Cross project linker
4.2 Build the project, (Ctrl+b) you should get a message on the console like the following one:
Fig 6. Cross project linker
As you can see, the project has been compiled and linked by using arm-linux-gnueabi-g++, that was the whole point. If you try to run the compiled from eclipse you wont see nothing happening. If you try to run it from the command line, it wont be recognize as an executable:
Fig 7. Error when executing the result from the host
But if you copy it and execute it from the Raspberry:
Fig 8. Project executed from Raspberry
Voila!! Our first C++ Cross-project running on Raspberry :D
4. Cross Debugging the 'Hello World' project
Now that we have run successfully our project, let's see how we can debug it.
4.1 Install on your Raspberry gdbserver
sudo apt-get install gdbserver
4.2 Run gdb server against your program, listening on the port 2345:
gdbserver :2345 MyFirstRaspBerryProject
If everything went ok, the system should get stuck waiting for a remote debug:
Fig 9. gdbserver started on the raspberry machine
4.3 From Eclipse click on the arrow besides the symbol of debug and select 'Debug Configurations'. Click twice on the tab 'C/C++ Remote Application' an new remote application will be automatically created:
Fig 10. New debug configuration
Click on the text 'Select other...' besides the button 'Apply'. On the new window, check the box 'Use configuration specific settings' and select 'GDB (DSF) Manual Remote Debuggin Launcher':
Fig 11. Manual Remote selection
Clicking on OK it will bring us to the previous screen. Set the main and debugger tabs as following:
Fig 12. Main Tab
Fig 13. Debugger Main Tab
Fig 14. Debugger Connection tab
Now you can click on the Debug button and:
Fig 15. Cross Debugging our project


